Wednesday, May 28, 2014

Slow Cooker BBQ Beans and Sausage

I thought the recipe sounded good and I knew Q would really like it but to me it sounded alright. I was pleasantly surprised that I liked this much more than I thought that I would. The beans were cooked perfectly and had so much flavor with a little sweet ring to them. The sausages weren't dried despite the fact that they were already cooked before using them. All in all this meal was a success! I had two beautiful ears of corn from the market. To make the corn,  I simply wrapped them in foil with some butter and BBQ seasoning and baked them in the toaster oven for 30 minutes at 375º.

Slow Cooker BBQ Beans & Sausage      
Serves 4-6
BBQ Beans & Sausage
ingredients
• 1 1/2 cups chicken broth
• 1/6 cup tomato paste
• 1/6 cup brown sugar
• 1 1/2 Tbsp molasses
• 1 1/2 Tbsp honey mustard (I combined equal amounts of Dijon & honey to make honey mustard)
• 1 Tbsp BBQ seasoning blend
• 2 cloves garlic, minced
• 1/2 dried navy beans, rinsed & picked over
• 1/8 tsp ground cloves
• 1 small onion, peeled & halved
• 3 chicken sausages (I used habanero pepper jack), halved lengthwise
• 1 Tbsp apple cider vinegar
• 1/2 Tbsp Worcestershire sauce
Pepperoncini's & sliced scallions for topping

directions
1. Whisk the first 7 ingredients with 1 1/2 cups water together in a slow cooker. Add the beans and stir, tuck the onion and sausages into the beans. Cover and cook on high for 6 hours.

2. Stir in the vinegar and Worcestershire sauce and let sit uncovered for 15 minutes (or longer if you wish). Top with peppers and scallions. You can also serve this with some cornbread as well. I served it with some corn on the Cobb which was a nice compliment to this meal.

Corn on the Cobb
Enjoy!

This recipe was adapted from Food Network Cookbook.

BBQ Ribs, Grilled Asparagus & Twice Baked Taters

This past weekend we had some delicious kick off the summer grillin' food - ribs! We are still trying to get the hang of different formations on our charcoal grill but these ribs came out pretty tasty. The thinner cut came out a little bit dry so we just need to adjust the cooking time for the smaller ribs next time. The thicker cut came out great - they got a little too dark once we put the BBQ sauce on - maybe because the fire was too hot? It's a learning curve but we will perfect it eventually. Oh and we threw the asparagus (fresh from the market) on the grill after the ribs were done for only a few minutes and they came out PERFECT - they were so good! It was hard not to eat all of them before we sat down at the table. I just tossed the asparagus in some EVOO with salt & pepper, simple, yet delish!

As another side to this dish I had frozen the leftover Twice Baked Taters I made in a previous meal and they were just as good if not better than when I first made them. So, now I know that freezing potatoes works out fine. 

BBQ St. Louis Style Ribs      
Serves 2
BBQ Ribs

Grilled Asparagus & Twice Baked Taters
ingredients
• 1 rack St. Louis ribs, cut in half
• 1/4 c Dry Rub: 1 Tbsp black pepper, 2 Tbsp Kosher salt, 2 Tbsp ground cumin, 1/4 cup paprika, 3 Tbsp garlic powder, 2 tbsp onion powder, 1/4 cup light brown sugar, 3 Tbsp ancho chile powder
• Yellow Mustard
• Your favorite BBQ Sauce (I had some homemade in the freezer that I thawed out for this)

directions
1. Combine the dry rub mix in a small bowl and mix well. Rinse the ribs and pat dry with paper towels. Squirt some yellow mustard and coat both sides of the ribs. Then a heavy coating of the dry rub, make sure to get all over and press the rub in with your fingers. Wrap in plastic wrap and refrigerate up to over night to marinate them. Reserve leftover dry rub in a sealed container in the fridge up to 1 month.

2. Set out a few large sheets of foil (we double lined ours). Place each half rack on the foil and create pouches for the ribs with the foil being sure to seal well a the top. Grill ribs over indirect heat for 1 - 1 1/2 hours depending on how hot your grill is. Open up the foil and peel back so the ribs are exposed. Carefully flip the meat over so the meat side is on top and cook for another 20 minutes until the meat is tender and the meat has shrunk back from the bones.

3. Take the ribs out of the foil and place directly on the grill grates and baste with BBQ sauce, cook for another 10 minutes until you have a crisp exterior. Ours were already crisp in the foil so we didn't have to cook for very long with the BBQ sauce. Again, our grill may have been too hot so that might be way it got a little bit too dark.

Enjoy!

This recipe was adapted from Guy Fieri (dry rub) and ME (asparagus & BBQ sauce).

Monday, May 26, 2014

Classic Herb Chicken Salad

I love making chicken salad this time of year, in fact, I always pick up the 6 pack of canned chicken at Costco when I go during the summertime. It's just a staple in our house - chicken salad sandwiches rock! There are so many different ways to make chicken salad. In fact,  I was super excited to see in the latest issue of Rachael Ray's mag that there are 8 different spins on how to make chicken salad so I will probably try all of 'em!

We like the salad to be somewhere in between dry and super soggy... so I just play around with the dijon and mayo until I get it to the right consistency. Remember, you can always add but you can't take it out! :-P

I also get really excited about recipes where I can use a few types of herbs from our garden which is the case here - I like the combination of parsley, dill & chives. I've pretty much used up all of my parsley plant so I decided to plant some more seeds the other day to have a few plants since I seem to use that herb pretty often.

So here's how I made the first chicken salad of the season... Lunch this week is gonna be sooo good this week!


Classic Herb Chicken Salad      
Serves 4-6
Classic Herb Chicken Salad

ingredients
• 2 cans chicken (I get mine at Costco they are double the size too), drained
• 1/2 c - 3/4 cup mayo
• 1/4 c - 1/2 c dijon mustard
• 2 stalks celery, finely chopped
• few shakes of garlic powder
• 2 Tbsp fresh parsley, chopped
• 1 Tbsp fresh chives, chopped
• 1 Tbsp fresh dill, chopped
• Kosher Salt & Freshly Cracked Black Pepper, to taste

directions
Combine all the ingredients in a bowl and mix until well combined. Store in fridge covered. 

Enjoy!

This recipe was adapted from ME!

Cheesy Breakfast Casserole

I found this recipe on pinterest the other day and it sounded so good I just had to make it for this weekend so I didn't have to cook breakfast each morning. I modified the recipe a bit and added green chile as well which made it even more delicious, of course. It was pretty simple to make - I think one thing I'd change is to cook the potatoes just a bit in a skillet before tossing them into the mixture as some of them didn't taste done enough for us. Other than that it was delish!


Cheesy Breakfast Casserole      
Serves 8
Cheesy Breakfast Casserole
ingredients
• 1 lb hot bulk sausage
• 1 medium yellow onion, diced
• 4 cloves garlic, minced
• 1 large red bell pepper, diced
• 4 roasted green chiles, peeled, seeded & roughly chopped
• 6 eggs
• 1/3 cup whole milk
• 20 oz bag frozen diced potatoes, thawed
• 1 1/2 cups shredded mozzarella cheese
• 1/2 cup shredded sharp cheddar cheese
• 1/4 teaspoon Freshly Cracked Black Pepper

directions
1. Preheat oven to 375º. Cook the sausage in a large cast iron skillet until browned, remove from pan and drain on paper towel lined plate. Add the onion and garlic and bell pepper to the skillet and cook for 5 minutes stirring occasionally. Add the green chile at the last minute of cooking. 

2. Meanwhile whisk the eggs, milk and pepper in a bowl, set aside. Add the sausage and onion/pepper mixture to a large bowl with the potatoes and stir until well combined. Then add the egg mixture, mozzarella cheese and stir well with a spatula. 

3. Spray a 9x13 baking dish with cooking spray and pour the mixture into the dish, spreading evenly. Top with the cheddar cheese and cover tightly with foil. Bake for 20 minutes, then remove the foil and bake uncovered for an additional 10-15 minutes until bubbly and the cheese is all gooey and melty. Let the casserole rest for at least 5 minutes before digging in!

Enjoy!

This recipe was adapted from Gimme Some Oven.

Saturday, May 24, 2014

Cheesy Baked Tortellini

It was the end of the work week and I really wanted to have something comforting for dinner and this turned out to be very tasty and perfect for a Friday night! It's quick and easy... you can make the marinara sauce yourself, however, I just didn't have it in me to go that route. I didn't want to go out to eat either because quite frankly every time we have lately it's been a big disappointment (gosh it sounds like we are just so picky- NO, we just want quality when we spend our hard earned mula!)

Q is the best husband - he picked up the last minute ingredients on his way home and we both enjoyed such a comforting meal together to unwind from the week. We also had some bread (umm how can you eat pasta without more carbs, right?!) and salad. Here's how we made the pasta dish....


Cheesy Baked Tortellini      
Serves 4-6
Cheesy Baked Tortellini

ingredients
• 2 cups marinara (store bought or homemade)
• 1/3 cup mascarpone cheese
• 1/4 cup fresh parsley, chopped
• 2 tsp fresh thyme, chopped
• 1 lb frozen cheese tortellini
• 2 oz thinly sliced smoked mozzarella (or just regular ole mozzarella shredded or sliced will work too)
• 1/4 cup grated Parmesan cheese

directions
1. Preheat oven to 350º. Coat an 8x8 baking dish with cooking spray evenly.

2. Mix the marinara sauce, mascarpone cheese and fresh herbs in a large bowl to blend together. Cook the tortellini in a pot of salted, boiling water until JUST tender, about 2 minutes and drain. Add the tortellini to the sauce and toss to coat evenly. Transfer this mixture to the baking dish and spread around evenly.

3. Top with mozzarella and Parmesan cheese. Cover the dish with foil and bake for 20 minutes. Uncover and bake for an additional 10 minutes. Note: it's a good idea to put the baking dish on a baking sheet JUST in case the dish decides to boil over it won't do so on the bottom of your oven but on the sheet instead!

Enjoy!

This recipe was adapted from Giada De Laurentiis Everyday Pasta

Friday, May 23, 2014

Quesadillas de Camarones

The original recipe (which can be found here) included instructions on how to make the quesadillas in a large cast iron skillet. We have a handy dandy quesadilla maker so we just used that - it's much healthier (because you aren't cooking them in fat) and it's much cleaner/faster to cook them. Not to mention its way easier than trying to flip a filled quesadilla in a pan without the stuffing flying out all over you!

I really liked this meal - I made enough for three quesadillas but that was way overkill and too much. One quesadilla split between two is more than enough food if you make a side of guacamole and we had leftover Corn Casserole.  Shrimp is definitely not one of Q's favorites  - but he will eat it for me because he knows how much I like it! What a great husband I have, hehe so lucky!!

Quesadillas de Camarones      
Serves 2
Quesadillas de Camarones
ingredients
• 1/2 lb medium shrimp, peeled & deveined, tails off
• Salt to taste
• 1/4 cup Hot enchilada sauce
• 1/2 small onion, sliced
• 1/2 small green bell pepper, sliced
• 2 burrito size flour tortillas
• 1 cup shredded pepper jack cheese
• salsa and guacamole for serving

directions
1.  Heat some oil in skillet over high heat, toss in room temperature shrimp. Cook for 5 minutes until crispy and cooked through, season with salt. Pour in sauce and toss to coat, cook for another minute or two. Remove from skillet and set aside on a plate. Add peppers and onions to the skillet and cook until charred on edges about 4 minutes. Set aside on plate.

2. Make the quesadillas by adding one tortillas to the quesadilla maker and add some cheese, then shrimp, then peppers and more cheese. Top with another tortilla, close the machine and cook until ready. Let cool slightly then slice into 6 pieces.
Guacamole!
Enjoy!

This recipe was adapted from Pioneer Woman.

Tangy Tomato Brisket, Pan Fried Kale & Twice Baked Taters


I really really really wanted this meal to turn out perfect - it wasn't bad but it just wasn't as good as I had hoped. I really think I cooked the brisket for too long.. it was dry but the flavor was really good. I have a tendency to forget to adjust the cook time based upon the measurement of meat I am cooking when I cut back the recipe. This is what had happened here - the original recipe called for 7 hours of cook time for 5 lbs worth of meat... I had 1 1/2 lbs so you see the dilemma. Otherwise everything else was very tasty and I would make it again using the correct cooking time.

Tangy Tomato Brisket
Serves 4
Tangy Tomato Brisket, Pan Fried Kale & Twice Baked Taters
ingredients
• 1-1/2 lb flat cut brisket
• 12 oz bottle chile sauce (I used Heinz)
• 1 dry onion soup mix packet
• several dashes of hot sauce (optional)

directions
1. Mix the sauce, onion soup mix and 1 cup of water in a small bowl. Place brisket in a dutch oven and pour the sauce on top, flip the brisket so it is well coated.

2. Cook in oven (covered) on 275º for 4-5 hours or until brisket is tender.

3. Slice and place meat back into dutch oven and coat with sauce, add a few dashes of hot sauce to the mix. Keep warm until ready to serve.
Tangy Tomato Brisket
Pan Fried Kale  
Serves 4
ingredients
• 1 large bunch kale, washed, stemmed & torn into pieces
• 5 cloves garlic, sliced thinly
• EVOO
• Kosher Salt & Freshly Cracked Black Pepper

directions
Heat the EVOO in a large cast iron skillet over medium-high heat. Add the kale and using tongs stir to coat in the oil. Continue cooking for 1-2 minutes then add garlic, S&P and keep stirring for another minute or two. Remove from heat and serve.

Twice Baked Taters    
Serves 4
Twice Baked Taters
ingredients
• 6-8 potatoes (I had a few different kinds on hand so I just used all of them)
• 4 oz cream cheese at room temperature
• 1-2 Tbsp EVOO
• 1 1/2 cups shredded pepper jack cheese
• 1/2 cup sour cream (light)
• 1 Tbsp chopped fresh chives
• 1 clove garlic, minced
• 2 roasted green chiles, seeded & roughly chopped
• Kosher Salt & Freshly Cracked Black Pepper

directions
1. Preheat hte oven to 375º. Drizzle potatoes with EVOO and rub with your hands to coat them evenly. Roast until they are tender and skin is crisp. This time will vary from 25 minute to an hour depending on how big your taters are!
2. Use a spoon and scoop out the insides leaving a little cup to stuff the mixture back into each potato. 
3. In a bowl combine the cheeses, sour cream, chives, chiles, garlic, S&P to taste with the scooped out potatoes and mash until very smooth. Taste and add seasonings that you see fit here. 
4. Scoop the mixture back into each potato and bake for 20-25 minutes until golden on top.

Enjoy!

This recipe was adapted from Pioneer Woman.

Monday, May 19, 2014

Hot Wings & Blue Cheese Dip

Mmmmmm, who doesn't love hot wings?!?! We love wings - I buy a big ole' bag of chicken wings at Costco and they are always a nice treat to have every once in a while. We cool 'em all different kind of ways - fried, baked or grilled. This time, we fried 'em! The sauce was really interesting because it called for Worcestershire and hot sauce at the end of the cooking time and I really think it created a very tasty sauce. It wasn't overwhelmingly spicy to us either... and baking it after frying it was a little eyebrow raising because I thought they would get really soggy. Note: we hate soggy wings - extra crispy please! But the flavor just really bakes into the chicken and they weren't too soggy so I think I'll definitely use this method again.

Hot Wings & Blue Cheese Dip
Serves 2
Hot Wings
ingredients
• 1/4 cup mayo
• 2/3 cup sour cream
• 1/4 cup blue cheese crumbles
• 5 dashes Worcestershire sauce
• canola oil for frying
• 18 wings
• 4 oz franks hot sauce
• 1/4 stick butter
• hot sauce
• celery & radish sticks for dipping
• Kosher Salt & Freshly Cracked Black Pepper

directions
1. Make the dip by combining the first 4 ingredients with S&P to taste. Set in fridge covered until ready to serve.

2. Make the sauce by heating the franks and butter over medium low until bubbly, turn off the heat and add a few shakes of hot sauce and Worcestershire sauce.

3. Fry the wings by heating 3" canola oil to 375º. Add half the wings and fry 5 minutes until golden brown, then fry the 2nd half for another 5 minutes. Drain on paper towels. While the wings are cooking preheat the oven to 325º. Place the hot wings in a baking dish and pour the wing sauce all over and toss around until coated. Bake for 15 minutes in oven, remove let cool slightly and serve with the blue cheese dip and veggies.
Blue Cheese dip with celery sticks & radish slices
Enjoy!

This recipe was adapted from Pioneer Woman.

Ranch Style Chicken and Corn Casserole

This was an incredible meal we made late last week that we grilled - between the yummy charcoal flavor and combination of cheese and bacon we really enjoyed it. I originally had 2 chicken breasts so we ended up with 4 chicken cutlets and that was just way to much for us so I adjusted the recipe below to show serving for 2... it was more than enough for us with the corn side dish as well. Oh and Q was ecstatic about this meal because it had bacon and more bacon.

Ranch Style Chicken
Serves 2
Ranch Style Chicken
ingredients
• 1 whole boneless, skinless chicken breast sliced in half
• 1/8 cup honey
• 1/8 cup dijon mustard
• juice of 1/4 lemon
• 1/2 tsp paprika
• 1/8 tsp salt
• pinch red pepper flakes
• 4 slices thick cut bacon, cut in half and fried until almost crisp (reserve 1 tbsp bacon grease)
• 1/2 cup shredded sharp cheddar or 2 slices cheddar

directions
1. Make the marinade: combine honey, Dijon, lemon juice, paprika, salt & crushed red pepper in a large bowl and whisk together. Add the chicken and toss around until well coated. Cover, refrigerate for 3 hours.

2. Preheat the grill to medium-high heat (make a spot on your grill to cook indirectly as well so the cheese has time to melt after the chicken is done cooking). Add the chicken and cook 3 minutes per side (brush a little bit bacon grease on each side of chicken prior to grilling). After flipping chicken, Lay 2 pieces of bacon on each breast then cover with cheese and slide chicken to indirect heat so it doesn't burn. Remove from grill once cheese has melted and let rest for 5 minutes before serving.

Now onto the side dish that I made to go along with this yummy chicken dish. 

I made the corn casserole for the holidays this past year and the family really enjoyed it - even though the liquid isn't thick and creamy it has the most amazing flavor. I used fresh corn right off the cobb this time and it was even better than the first time I made this due to the crunch factor that fresh corn brings to the table. Another twist I added this time was to add cooked bacon and green chile - oh yeah that sent it over the top! This is definitely a keeper in my arsenal of side dishes!

Corn Casserole with Green Chile & Bacon
Serves 4-6
Corn Casserole with Bacon & Green Chile
 ingredients
• 4 ears of corn, husked and kernels shaved off the cobb
• 1/2 red bell pepper, diced
• 1 jalapeno, minced
• 1/2 stick unsalted butter at room temperature
• 1/2 cup heavy cream at room temperature
• 1/4 cup whole milk at room temperature
• 2 roasted green chiles, seeded & chopped
• 4 slices thick cut bacon fried and chopped
• Kosher Salt & Freshly Cracked Black Pepper to taste

directions
1.Preheat the oven to 375º. Combine the ingredients in a large bowl and mix until combined (the butter might still be a little chunky and that's ok!).

2. Pour into a buttered baking dish and bake for 25 minutes until hot and bubbly. Stir before serving.

Enjoy!

This recipe was adapted from Pioneer Woman.

Monday, May 12, 2014

Walnut-Orange Coffee Cake

I'll be the very first to admit I am NOT a baker, in fact I really don't enjoy it. However, I am married to the biggest sweet tooth, so every now and then I will bust out and BAKE for him. Most of the time, it turns out alright for some reason (except for cookies, I can make a mean cookie), but cakes & pies are a bit of a challenge for me. It must be the whole chemistry thing or the exact measuring thing - both are not in the cards for me - Ha! Anyways, this cake actually turned out tasty - there could have been a fruit layer somewhere in between but that seemed like a hassle so I left that layer out.

I remember growing up my mom used to buy the Entenmann's Coffee Crumb cake, nearly every single week for my dad because he loved it. He would drink his coffee and stand over the sink eating the delicious crumb cake. Little did they all know (well, they probably did come to think of it), I would sneak downstairs in the middle of the night and cut off a few pieces and just eat the irresistible crumb topping and throw out the cake part (because it clearly wasn't delicious to me). And, other times I'd just pick off the crumb topping and leave the bare cake behind! Good times, it's the simple things sometimes, right?!?? This memory made it a bit more fun for me get through this very basic recipe hoping that the cake would taste just as good as I remember.

I also remember how every time my grandparents came to visit they had to have "dessert" after both lunch and dinner. It would be some sort of sweet/cake and decaf coffee - this cake just brings back lots of memories for me!!!

Drum roll.... it was delicious! WOW I will definitely be making this again! I don't drink coffee but it goes so well with this cake so you must!

Walnut-Orange Coffee Cake 
Makes 8x8 Cake
Walnut-Orange Coffee Cake
ingredients
• 2 3/4 cup flour
• 2/3 cup light brown sugar
• 1 tsp ground cinnamon
• Pinch of salt plus 1/2 tsp
• 5 Tbsp plus 1 stick butter at room temperature
• 1/2 cup finely chopped walnuts
• 1 tsp finely grated orange zest
• 1 tsp baking powder
• 1/2 tsp baking soda
• 1 cup sugar
• 2 eggs
• 2 tsp vanilla extract
• 1 cup sour cream

directions
1.Whisk 3/4 cup flour, brown sugar, cinnamon & a pinch of salt in a small bowl. Add 5 Tbsp butter and rub between your fingers until incorporated. Stir in the walnuts and orange zest. Set aside.

2. Preheat the oven to 350º and line 8x8 square baking dish with buttered/sprayed foil letting it overhang from the dish a bit after you press it down to fit the dish. Whisk 2 cups flour, baking powder, baking sod and 1/2 tsp salt in a large bowl.

3. In a stand mixer beat 1 stick butter with the sugar for 3 minutes until light and fluffy on medium-high speed. Add eggs, one at a time until well incorporated. Beat in vanilla. Reduce the speed to low and rotate adding in flour and sour cream in 3 batches. The batter will be very thick.

4.Spread the batter into the baking dish evenly and sprinkle the sugar topping you made in step 1 all over the top to cover evenly. Bake until golden brown and a toothpick comes out clean... for me it took 1 hr 5 minutes. Let cool for 20 minutes in dish then lift cake out and let cool completely on a rack.

Enjoy!

This recipe was adapted from Food Network Magazine.

Chicken-Rice Soup

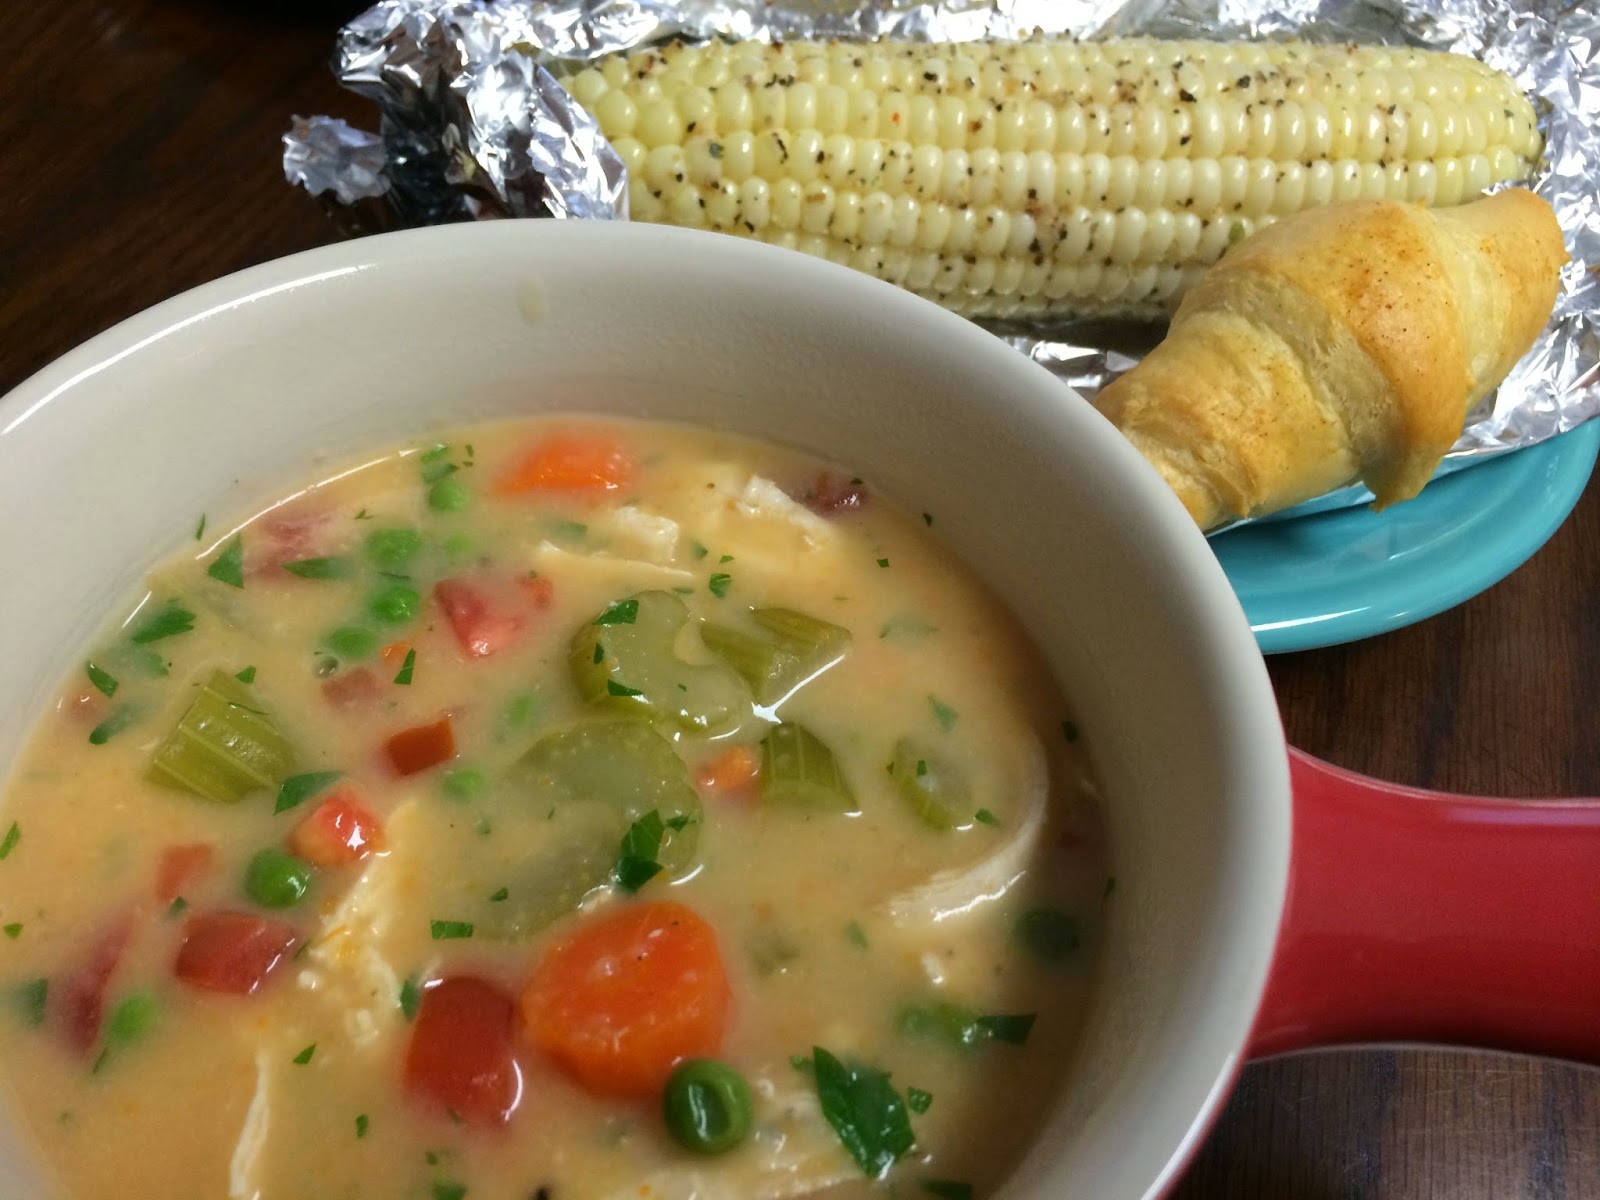
Tonight's meal consisted of a very delicious and might I say beautiful spring soup with a side of corn on the cobb. Most of the ingredients came from the farmers market basket last week - getting another tomorrow - yay! Q seasoned the corn with a bit of butter, salt & garlic pepper wrapped up in foil. He then cooked it in the toaster oven on 350º for 30 minutes - and it came out perfect (he was so happy I liked it, love you babe!) We also had some crescent rolls in the fridge - gah those are so good, we could probably devour an entire can of those in one sitting, yep.

The stock in this soup is fortified with pureed rice, tomatoes and other seasonings which I've never done before and it naturally thickened up the soup. This was probably one of, if not the best chicken soup I've made in a long time... the recipe said it was for 4 servings - ummm well I think it's more for 6 people or more... so needless to say I have lunches covered for the next few days. Here's how I made it:

Chicken-Rice Soup
Serves 6
Chicken-Rice Soup, Corn on the cobb & crescent rolls

ingredients
• 4 cups chicken broth
• 3 stalks celery, cut into 1/2" pieces
• 5 carrots, cut into 1/2" pieces
• 2 boneless, skinless chicken breasts (1 lb)
• 1/2 cup uncooked white rice
• 1 Tbsp tomato paste
• 3 plum tomatoes, finely chopped
• 1 cup frozen peas
• 1/3 cup heavy cream
• 1/2 cup chopped fresh parsley
• 1 Tbsp fresh lemon juice
• Kosher Salt & Freshly Cracked Black Pepper

directions
1. Combine the broth, celery & all but 1/2 cup carrots in a large pot. Cover and bring to a simmer over medium-high heat. Reduce the heat to medium low and add the chicken, 3/4 tsp each S&P. Cover and gently simmer for 18 minutes, turning chicken once during the cooking process. Remove the chicken from the pot and let rest on a cutting board. Keep stock warm.

2. Combine 4 cups water, rice, tomato paste, 1 chopped tomato and remaining carrots in a saucepan. Cover and bring to a boil; reduce heat to low; simmer, covered until rice and carrots are tender, about 15-20 minutes.

3. Puree the rice mixture until smooth; whisk into the pot with broth mixture. Add the frozen peas, heavy cream and the remaining tomatoes. Bring to a simmer.

4. Meanwhile, shred the chicken and return to the soup. Stir in the parsley and lemon juice; thin with water if needed and season with S&P.

Enjoy!

This recipe was adapted from Food Network Magazine.

Saturday, May 10, 2014

Buttermilk Pancakes

It's not often that I make pancakes but decided to whip up some buttermilk pancakes for breakfast this morning. The recipe was pretty simple and I am wondering why I don't make them from scratch more often. I served a side of ham and fresh oranges. It turned out to be quite a tasty breakfast.

Buttermilk Pancakes
Serves 4
Buttermilk Pancakes, Ham & fresh oranges
ingredients
• 1 1/2 cups all purpose flour
• 1/2 cup whole wheat flour
• 1 tsp cream of tartar
• 1 tsp baking soda
• 1/2 tsp salt
• 2 large eggs
• 1 3/4 cups buttermilk
• 1 1/2 tsp sugar
• 4 tbsp melted butter
Vegetable oil for skillet and maple syrup for topping

directions
1. Pour the flours, cream of tartar, baking soda and salt in a medium bowl and whisk together.

2. Whisk the eggs, buttermilk and sugar in a stand mixer until foamy, then add melted butter. Add the flour mixture slowly on low and stir until just combined.

3. Heat the griddle pan over medium heat and lightly brush with vegetable oil. Drop ladles of batter onto hot skillet to make the pancakes, flip when golden brown. Serve with butter and syrup.

Once the pancakes were done, I added sliced ham onto the hot griddle until charred on both sides - YUM!

Enjoy!

This recipe was adapted from Food Network Magazine.

Shredded Beef Tacos

Almost any slow cooker meal is a time saver in both prep and cleanup and I found this one to be that way as well. I was very excited about this meal, and it tasted very good but the meat turned out very dry. I'll admit I was concerned about that when I was piling it all in the slow cooker asking myself "Where is the liquid?"... going back to the cookbook to see if I had missed an ingredient or something. But after about 1-2 hours there was a ton of liquid from the meat and the veggies, whew I thought I was in the clear but the meat came out dry in the end - boo! Even when I added it back to the slow cooker with the juices it was still too dry for my taste.  So, if I were to make something like this again, I'd probably cook it less or make sure the meat was submerged in the juices after cooking for an hour. I know they say to not open the slow cooker, but I always do because I am way too curious not to.

Even with the dry meat at hand, we both tore this meal up and enjoyed it. I also made some simple guacamole (1 avocado, 1 tomato, 1 small onion, cilantro, salt, red pepper flakes and lime juice).

I also made a side dish called New Mexico Caviar, a bean dish I found in the Green Chile Bible. Unfortunately, it turned out to be a mushy, weird tasting concoction that we couldn't even eat - yikes! I just hate when that happens!

Shredded Beef Tacos
Serves  8
Shredded Beef Tacos

ingredients
• 4 lb beef round roast, cut into quarters
• 1 red onion, chopped (I had 1/2 red onion and 1/2 yellow onion so I just used that)
• 2 jalapenos (I used 1 jalapeno and 1 Fresno Chile)
• 5 large cloves garlic, minced
• Pinch of black pepper
• 1 pkg taco seasoning (I made my own using 1 tsp each cumin, ground coriander, garlic powder, Chile powder, black pepper, kosher salt and 1/4 tsp cayenne pepper)
• 1 tsp Chile powder
• 6" flour tortillas or corn tortillas, warmed (we used a combination of both and liked 2 corn tortillas per taco versus the flour)
• 3 Roma tomatoes, chopped
• Toppings:  shredded lettuce, sour cream, sliced jalapenos, shredded cheese, salsa & guacamole

directions
1. Place the first 7 ingredients into the slow cooker and cook on low for at least 6 hours and up to 8 hours. Remove the meat to a cutting board, trim away any fat and shred, return to the slow cooker with the juices and stir to coat.

2. Serve on a flour tortillas and pile on your favorite toppings.
Guacamole!

Enjoy!

These recipes were adapted from Southwest Slow Cooking & ME!

Wednesday, May 7, 2014

Jalapeno Chicken Sausage Veggie Saute

We tried out a new brand of "less processed" chicken sausages and they were actually pretty dang good. I'm not entirely sure that they were less processed than regular sausages/kielbasa but they did a great job on the packaging because we bought 'em. Anyway, I got the Jalapeno flavor and it had just the right amount of heat to them and they went great in this dish too! This meal came together rather quickly so it's perfect for a weeknight and it is a light meal. I'd say it is a lighter take on Italian sausage and peppers, a dish that I LOVE! I added some rice/quinoa mix as a side but the original recipe calls for polenta. Eh- we are not fans of "the polenta".

Jalapeno Chicken Sausage Veggie Saute
Serves 4 
Jalapeno Chicken Sausage Veggie Saute
ingredients
• 4 links jalapeno chicken sausage, sliced
• 2 tsp EVOO
• 1 yellow bell pepper, sliced
• 1 Vidalia or sweet onion, sliced
• 1 zucchini, sliced
• 8 oz whole baby bellas, sliced
• 1 tsp Italian seasoning
• 2 Tbsp balsamic vinegar
• 1/4 tsp black pepper
• prepared rice for serving

directions
1. Heat oil in a large cast iron skillet over medium heat. Add bell pepper and onion, saute for 4 minutes. Add sausage and saute for 2 minutes then add zucchini, shrooms and seasonings.

2. Remove from heat add vinegar and toss to coat all the ingredients. Meanwhile make the rice.

Serve the sausage and veggies over rice. I used the Brown rice and quinoa packets that you can microwave (I get them at Costco) and they are delicious and fantastic in a pinch. My brother and sister in law turned us on to these...

Enjoy!

This recipe was adapted from Food Network magazine.

Fresh from the Market this week...

I recently joined a local food co-op (Farmers Market Baskets) and I am really enjoying this experience. And... since it has to do with food and what we eat I thought it would be fun to share my experiences on the blog as well. I haven't signed up for repeating baskets yet as I am still trying to figure out which day works best for me to pick them up. So, for now, I am just ordering each week manually which is a breeze. I picked up my basket this week (I get the Classic Small basket), they have crates for you when you walk in and you pile all of your goodies in one of their bags or just use your own like I do. Then on the other side there is a mini market and is different each week - I get all excited to see what they have. I have my fingers crossed that the will have fresh eggs and they did this week. I got a dozen for $4, this may seem pricey but fresh eggs are worth it to us.

They also had a ton of other stuff but all I picked up was a 3 lb bag of grapefruits ($3 and they are so delicious) and the eggs. Now, if you think you hate grapefruit try some fresh grapefruit that hasn't been sitting in the grocery store and if it's like what we experienced you might just fall in love with it.

I've started making a big salad, chopped veggies each week with the basket items so that we eat plenty of veggies each day. I've really noticed a difference in how I feel because I am eating so many more fruits and veggies every single day. Today I made a salad with the lettuce, red bell pepper, red onion, carrots (from last week's basket), cucumber, tomatoes & celery (had already). I chopped it all up stored the veggies separately from the lettuce. I put a damp paper towel in the bowl to help absorb the moisture and keep the veggies from drying out. It seems to work well so I am going to keep doing it.

For the dressing I made one of our favorites... Creamy Italian, recipe follows. So I am pretty excited about all the apples, pears, grapefruit and veggies I got this week to help us eat just a little bit more of a whole food balanced life. :-) Yeah well you can thank all the documentaries I've been watching lately - ha!


Creamy Italian Dressing
Makes about 2 cups

ingredients
• 1/2 cup mayo
• 6 Tbsp red wine vinegar
• 4 Tbsp each sour cream and EVOO
• 2 tsp Italian seasoning
• 2 cloves garlic, peeled
• 1/2 tsp kosher salt
• 2 Tbsp freshly chopped parsley

directions
Combine all the ingredients except chopped parsley in a blender and blend until smooth and well combined. Transfer to a jar that has a lid with the parsley and shake until well combined. Let sit in fridge for an hour for the flavors to meld together and become super yummy!

Enjoy!
This recipe was adapted from Food Network.